> ## Documentation Index
> Fetch the complete documentation index at: https://docs.pods.finance/llms.txt
> Use this file to discover all available pages before exploring further.
# Fireblocks Integration
> Enterprise-grade custody integration with Pods using Fireblocks Smart Wallets
This guide explains how clients with Fireblocks custody can integrate with the Smart Wallet and Strategy system, including deposits, withdrawals, position tracking, and recommended security best practices.
## Overview
The integration leverages Smart Wallets to provide segregated user accounts while keeping your Omnibus wallet isolated from strategy bytecode execution. This architecture ensures maximum security by preventing your main operational wallet from signing potentially untrusted transactions.
## Architecture Flows
Depending on how you custody user funds on Fireblocks, the integration has two possible entry points. Both paths converge into the same flow after the owner vault is defined.
* **Omnibus Account** — all users share a single Fireblocks vault. You must create a dedicated **Vault Owner** that will act as the signer for every Smart Wallet. This isolates strategy execution risk from the vault that actually holds funds (Omnibus).
* **Segregated Vaults** — each user already has their own Fireblocks vault. That vault is used directly as the Smart Wallet owner, so no additional setup is required.
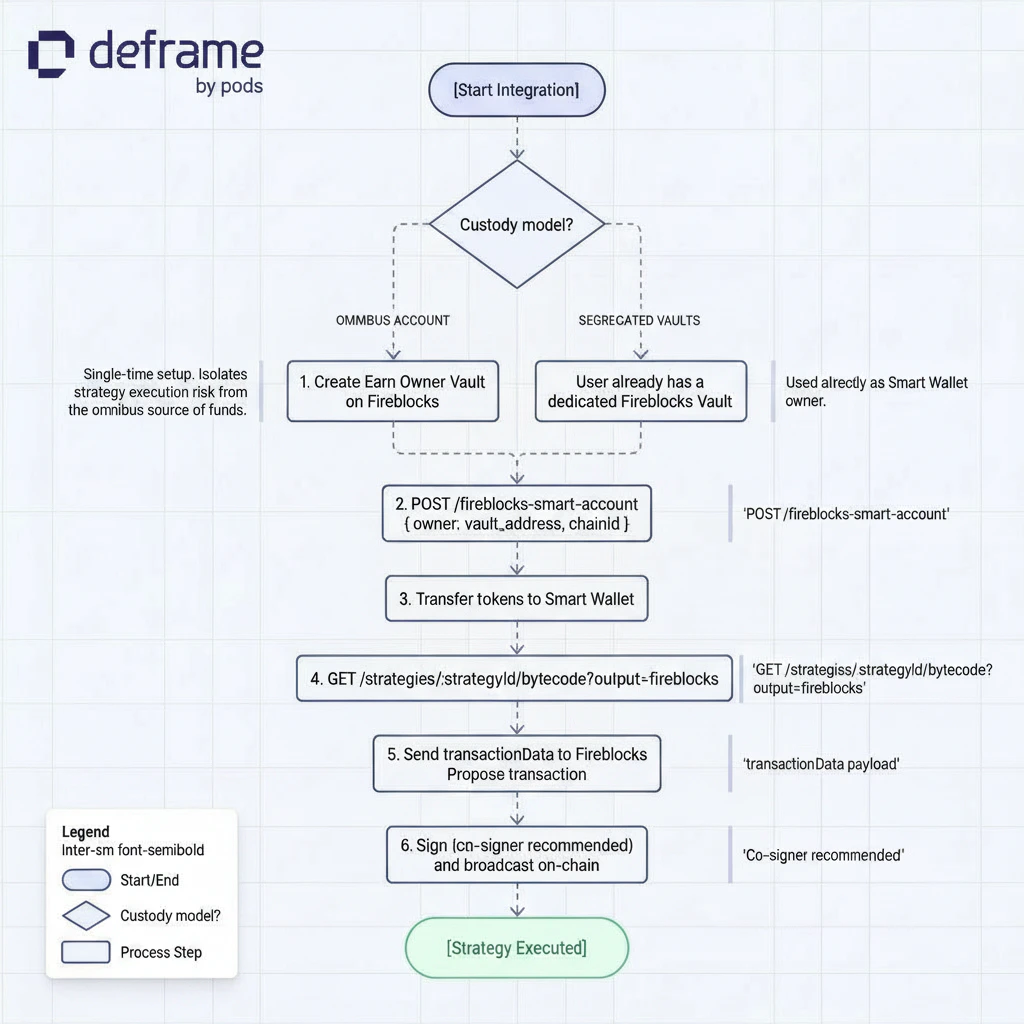 In the **Omnibus** model, the *Vault Owner* created in step 1 is the signer for every Smart Wallet you provision. In the **Segregated** model, each user's own vault plays that role — there is no shared owner vault to create.
## Prerequisites
Before starting the integration, ensure you have:
* A Fireblocks account with API access
* Understanding of Fireblocks Transaction Authorization Policy (TAP)
* Familiarity with the [Architecture Overview](/getting-started/architecture)
***
## 1. Fireblocks Setup
To safely interact with strategy bytecode while isolating your Omnibus wallet, Fireblocks must be configured with dedicated roles and policies.
### Creating Roles
To ensure clean separation of responsibilities and secure execution:
| Role | Description |
| --------------- | ------------------------------------------------------------------------------------------------------------------------------------------------------------------------------------------ |
| **Initiator** | The *API user* or service responsible for submitting strategy-related transactions to Fireblocks. |
| **Vault Owner** | A dedicated vault that acts as the Smart Wallet Owner. This address serves as the signer for smart wallet transactions, providing security segmentation from your main operational wallet. |
### Creating Policies
Two policies must be configured in Fireblocks to ensure automated, safe signing of transactions:
#### Contract Call Policy
| Setting | Value |
| --------- | --------------------------------------------------------------- |
| Initiator | The API user created for calling Fireblocks strategy operations |
| Source | Vault Owner |
| Signer | Co-signer (for automatic signing) |
***
## 2. Smart Wallet Creation
Each user receives their own segregated smart wallet.
Smart wallets (Gnosis Safe accounts) can be provisioned via the API:
```http theme={null}
POST /fireblocks-smart-account
```
**Request Body:**
| Parameter | Type | Required | Description |
| --------- | ------ | -------- | ----------------------------------------------- |
| `owner` | string | ✅ | The Vault address that will own the Gnosis Safe |
| `chainId` | number | ✅ | Chain ID on which to deploy the Safe |
**Example Request:**
```bash theme={null}
curl --request POST \
--url https://api.pods.finance/fireblocks-smart-account \
--header 'Content-Type: application/json' \
--header 'x-api-key: YOUR_API_KEY' \
--data '{"owner": "0xYourVaultOwnerAddress", "chainId": 137}'
```
**Example Response:**
```json theme={null}
{
"address": "0xDeployedSafeAddress",
"owner": "0xYourVaultOwnerAddress",
"chainId": 137
}
```
The Safe address is computed deterministically via CREATE2 and returned immediately. Actual on-chain deployment happens asynchronously in the background. If the Safe is already deployed, the existing address is returned.
Once provisioned, store the mapping between your internal user IDs and their smart wallet addresses:
```
userId → smartWalletAddress
```
This mapping enables you to:
* Display user balances and yield
* Track user performance
* Execute operations on behalf of users
***
## 3. Deposit Flow
When a user wants to deposit into a strategy (e.g., 100 USDC):
Transfer the deposit amount from your Omnibus wallet to the user's `smartWalletAddress`.
Fetch the bytecode for the deposit operation:
```http theme={null}
GET /strategies/:id/bytecode?action=lend&amount=100000000&wallet=0x...&output=fireblocks&accountId=YOUR_VAULT_ACCOUNT_ID
```
When using Fireblocks, set `output=fireblocks` and provide `accountId` (the Fireblocks vault account ID). The response will include a `transactionData` object ready to submit directly to the Fireblocks API instead of a raw `bytecode` array.
See [How to Deposit](/guides/yield/deposit) for detailed parameter information.
1. Use the **Vault Owner** signer (NOT the Omnibus signer) to sign the transaction
2. If using `output=fireblocks`, the response contains a `transactionData.transactionRequest` object ready to submit directly to the Fireblocks Transactions API (`POST /v1/transactions`)
3. If using `output=bytecode` (default), execute the returned bytecode through Fireblocks manually
4. The transaction will deposit funds from the smart wallet into the strategy
**Example: submitting the response to the Fireblocks SDK**
```typescript theme={null}
import axios from 'axios'
import { BasePath, Fireblocks, TransactionOperation, TransferPeerPathType } from '@fireblocks/ts-sdk'
const fireblocks = new Fireblocks({
apiKey: process.env.FIREBLOCKS_API_KEY,
basePath: BasePath.US,
secretKey: Buffer.from(process.env.FIREBLOCKS_SECRET_KEY, 'base64').toString('ascii')
})
const podsResponse = await axios.get(
'https://api.pods.finance/strategies/Aave-USDT-Polygon/bytecode',
{
params: {
action: 'lend',
amount: '100000000',
wallet: '0xYourSmartWalletAddress',
output: 'fireblocks',
accountId: 'YOUR_VAULT_ACCOUNT_ID'
},
headers: {
'x-api-key': process.env.PODS_API_KEY
}
}
)
const transactionData = podsResponse.data.transactionData
// Structure example
// const transactionData = {
// transactionRequest: {
// operation: TransactionOperation.ContractCall,
// assetId: 'ETH',
// source: {
// type: TransferPeerPathType.VaultAccount,
// id: ''
// },
// destination: {
// type: TransferPeerPathType.OneTimeAddress,
// oneTimeAddress: {
// address: ''
// }
// },
// amount: '0',
// extraParameters: {
// contractCallData: ''
// },
// failOnLowFee: true
// }
// }
const contractCallTransaction = await fireblocks.transactions.createTransaction(transactionData)
console.debug('Transaction Result: ', contractCallTransaction.data)
```
***
## 4. View User Positions and Yield
To fetch a user's position, balance, or yield:
```http theme={null}
GET /wallets/:smartWalletAddress
```
This endpoint provides all data needed for user-facing dashboards and reporting. See [How to Check Open Positions](/guides/yield/check-positions) for more details.
***
## 5. Withdrawal Flow
Withdrawals follow the reverse flow:
```http theme={null}
GET /strategies/:id/bytecode?action=withdraw&amount=100000000&wallet=0x...&output=fireblocks&accountId=YOUR_VAULT_ACCOUNT_ID
```
Sign and execute the transaction using the **Vault Owner** signer through Fireblocks.
After the withdrawal completes, transfer funds from the smart wallet to the destination:
* Back to your **Omnibus wallet**, or
* Any other target address
***
## Trade-offs
Requires two separate transfers for deposits and withdrawals: Transfer IN (Omnibus to Smart Wallet) and Transfer OUT (Smart Wallet to destination)
Your Omnibus signer is never exposed to potentially malicious bytecode, preventing scenarios similar to known custody exploits
Each user operates through a fully segregated smart wallet
Clean audit trail and easier accounting per user. Aggregated deposit analytics available via the `/analytics` endpoint
***
## Optional: Additional Security Layer
For maximum security, you can integrate **Blockaid** to simulate and validate bytecode before signing it on Fireblocks.
This adds defense-in-depth by detecting unexpected contract behavior, malicious payloads, and incorrect calldata or parameters.
***
## Next Steps
Generate bytecode for depositing into yield positions
Learn how to withdraw from positions
Monitor your open yield positions
Embedded wallet solution with social login
In the **Omnibus** model, the *Vault Owner* created in step 1 is the signer for every Smart Wallet you provision. In the **Segregated** model, each user's own vault plays that role — there is no shared owner vault to create.
## Prerequisites
Before starting the integration, ensure you have:
* A Fireblocks account with API access
* Understanding of Fireblocks Transaction Authorization Policy (TAP)
* Familiarity with the [Architecture Overview](/getting-started/architecture)
***
## 1. Fireblocks Setup
To safely interact with strategy bytecode while isolating your Omnibus wallet, Fireblocks must be configured with dedicated roles and policies.
### Creating Roles
To ensure clean separation of responsibilities and secure execution:
| Role | Description |
| --------------- | ------------------------------------------------------------------------------------------------------------------------------------------------------------------------------------------ |
| **Initiator** | The *API user* or service responsible for submitting strategy-related transactions to Fireblocks. |
| **Vault Owner** | A dedicated vault that acts as the Smart Wallet Owner. This address serves as the signer for smart wallet transactions, providing security segmentation from your main operational wallet. |
### Creating Policies
Two policies must be configured in Fireblocks to ensure automated, safe signing of transactions:
#### Contract Call Policy
| Setting | Value |
| --------- | --------------------------------------------------------------- |
| Initiator | The API user created for calling Fireblocks strategy operations |
| Source | Vault Owner |
| Signer | Co-signer (for automatic signing) |
***
## 2. Smart Wallet Creation
Each user receives their own segregated smart wallet.
Smart wallets (Gnosis Safe accounts) can be provisioned via the API:
```http theme={null}
POST /fireblocks-smart-account
```
**Request Body:**
| Parameter | Type | Required | Description |
| --------- | ------ | -------- | ----------------------------------------------- |
| `owner` | string | ✅ | The Vault address that will own the Gnosis Safe |
| `chainId` | number | ✅ | Chain ID on which to deploy the Safe |
**Example Request:**
```bash theme={null}
curl --request POST \
--url https://api.pods.finance/fireblocks-smart-account \
--header 'Content-Type: application/json' \
--header 'x-api-key: YOUR_API_KEY' \
--data '{"owner": "0xYourVaultOwnerAddress", "chainId": 137}'
```
**Example Response:**
```json theme={null}
{
"address": "0xDeployedSafeAddress",
"owner": "0xYourVaultOwnerAddress",
"chainId": 137
}
```
The Safe address is computed deterministically via CREATE2 and returned immediately. Actual on-chain deployment happens asynchronously in the background. If the Safe is already deployed, the existing address is returned.
Once provisioned, store the mapping between your internal user IDs and their smart wallet addresses:
```
userId → smartWalletAddress
```
This mapping enables you to:
* Display user balances and yield
* Track user performance
* Execute operations on behalf of users
***
## 3. Deposit Flow
When a user wants to deposit into a strategy (e.g., 100 USDC):
Transfer the deposit amount from your Omnibus wallet to the user's `smartWalletAddress`.
Fetch the bytecode for the deposit operation:
```http theme={null}
GET /strategies/:id/bytecode?action=lend&amount=100000000&wallet=0x...&output=fireblocks&accountId=YOUR_VAULT_ACCOUNT_ID
```
When using Fireblocks, set `output=fireblocks` and provide `accountId` (the Fireblocks vault account ID). The response will include a `transactionData` object ready to submit directly to the Fireblocks API instead of a raw `bytecode` array.
See [How to Deposit](/guides/yield/deposit) for detailed parameter information.
1. Use the **Vault Owner** signer (NOT the Omnibus signer) to sign the transaction
2. If using `output=fireblocks`, the response contains a `transactionData.transactionRequest` object ready to submit directly to the Fireblocks Transactions API (`POST /v1/transactions`)
3. If using `output=bytecode` (default), execute the returned bytecode through Fireblocks manually
4. The transaction will deposit funds from the smart wallet into the strategy
**Example: submitting the response to the Fireblocks SDK**
```typescript theme={null}
import axios from 'axios'
import { BasePath, Fireblocks, TransactionOperation, TransferPeerPathType } from '@fireblocks/ts-sdk'
const fireblocks = new Fireblocks({
apiKey: process.env.FIREBLOCKS_API_KEY,
basePath: BasePath.US,
secretKey: Buffer.from(process.env.FIREBLOCKS_SECRET_KEY, 'base64').toString('ascii')
})
const podsResponse = await axios.get(
'https://api.pods.finance/strategies/Aave-USDT-Polygon/bytecode',
{
params: {
action: 'lend',
amount: '100000000',
wallet: '0xYourSmartWalletAddress',
output: 'fireblocks',
accountId: 'YOUR_VAULT_ACCOUNT_ID'
},
headers: {
'x-api-key': process.env.PODS_API_KEY
}
}
)
const transactionData = podsResponse.data.transactionData
// Structure example
// const transactionData = {
// transactionRequest: {
// operation: TransactionOperation.ContractCall,
// assetId: 'ETH',
// source: {
// type: TransferPeerPathType.VaultAccount,
// id: ''
// },
// destination: {
// type: TransferPeerPathType.OneTimeAddress,
// oneTimeAddress: {
// address: ''
// }
// },
// amount: '0',
// extraParameters: {
// contractCallData: ''
// },
// failOnLowFee: true
// }
// }
const contractCallTransaction = await fireblocks.transactions.createTransaction(transactionData)
console.debug('Transaction Result: ', contractCallTransaction.data)
```
***
## 4. View User Positions and Yield
To fetch a user's position, balance, or yield:
```http theme={null}
GET /wallets/:smartWalletAddress
```
This endpoint provides all data needed for user-facing dashboards and reporting. See [How to Check Open Positions](/guides/yield/check-positions) for more details.
***
## 5. Withdrawal Flow
Withdrawals follow the reverse flow:
```http theme={null}
GET /strategies/:id/bytecode?action=withdraw&amount=100000000&wallet=0x...&output=fireblocks&accountId=YOUR_VAULT_ACCOUNT_ID
```
Sign and execute the transaction using the **Vault Owner** signer through Fireblocks.
After the withdrawal completes, transfer funds from the smart wallet to the destination:
* Back to your **Omnibus wallet**, or
* Any other target address
***
## Trade-offs
Requires two separate transfers for deposits and withdrawals: Transfer IN (Omnibus to Smart Wallet) and Transfer OUT (Smart Wallet to destination)
Your Omnibus signer is never exposed to potentially malicious bytecode, preventing scenarios similar to known custody exploits
Each user operates through a fully segregated smart wallet
Clean audit trail and easier accounting per user. Aggregated deposit analytics available via the `/analytics` endpoint
***
## Optional: Additional Security Layer
For maximum security, you can integrate **Blockaid** to simulate and validate bytecode before signing it on Fireblocks.
This adds defense-in-depth by detecting unexpected contract behavior, malicious payloads, and incorrect calldata or parameters.
***
## Next Steps
Generate bytecode for depositing into yield positions
Learn how to withdraw from positions
Monitor your open yield positions
Embedded wallet solution with social login